This Term's Theme is;

This Weeks Activities:
Instructions are in RED
Last Week's Top 5 Kahooters:
(Remember, if you don't sign in Kahoot with your initials, you won't be counted on the leader board - no nicknames)
Well done to SH, the 'Ice-Cream'
Kahoot Champion
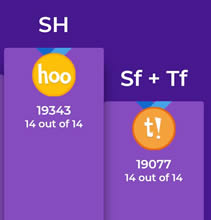
with SF and big sis second !
Activities for Week Beginning 29th June
Click here to go straight to the relevant day's activities:
Monday 29th June:
Task 1: A Random Fun Kahoot Quiz:
Lets do a quiz about 'Peppa Pig' - it's important we keep up our knowlegde of children's tv.
Follow the simple instructions below to take part - have a go, have a guess, see if you can finish in the top 5 !
1. All you need to do is go to 'kahoot.it', or click on the
banner below..
2. Type in the code of the quiz I have provided below.
3. Type in your initials so I will know its you.
3. Choose A, B, C or D in the time allowed.
4. The Quiz quizes finishes at 3:00pm on Friday - I'll post the results
up next week.
Game PIN: 07197889
Task 2: Physical Education:
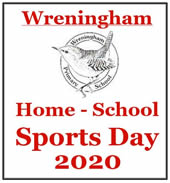
This week, it's Sport Day 2020 week. There are 9 events to compete in, and every score you get will count towards the Wreningham Sports Day House trophy, whether you are at home or in school.
Start your Sports Day events today and record your results. Click on the poster below to visit the Sports Day 2020 page where I have posted all Mrs Furness' instructions and provided links to recording sheets.


Tuesday 30th June:
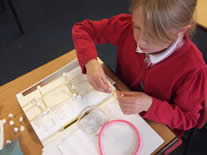
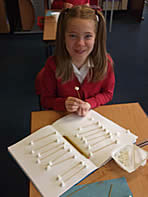
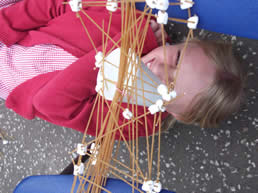
Design and Technology:
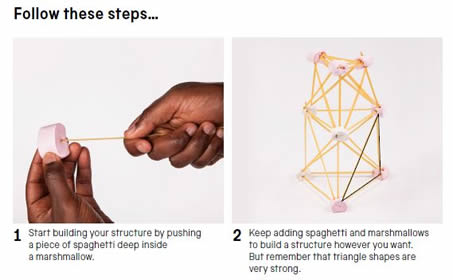
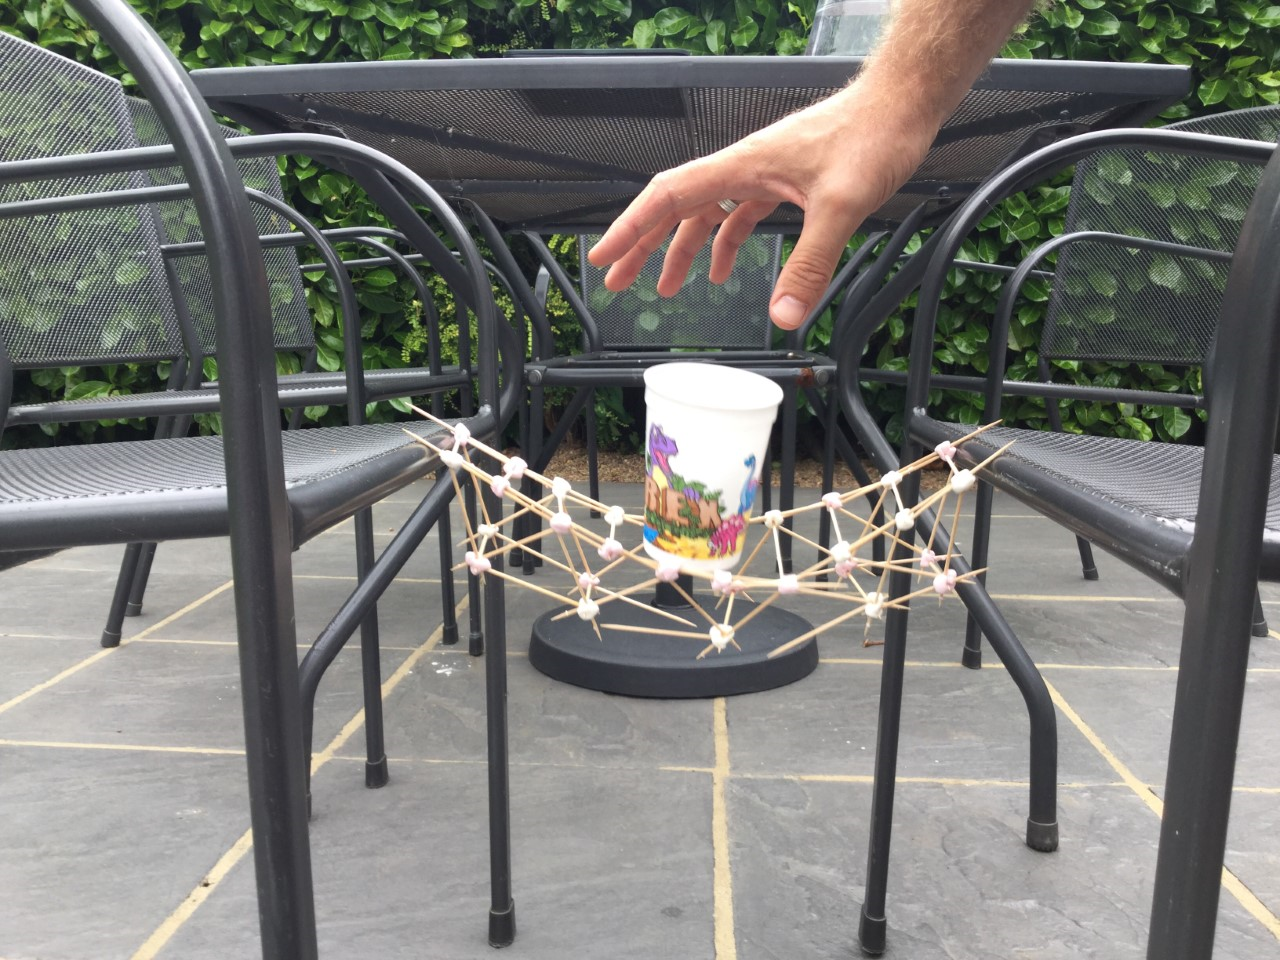
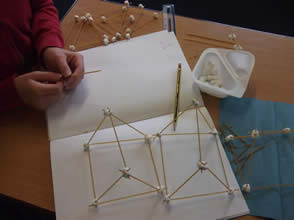
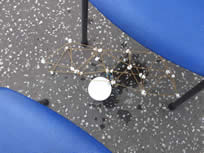
This week we are going to continue to use design skills to solve a bridge problem.
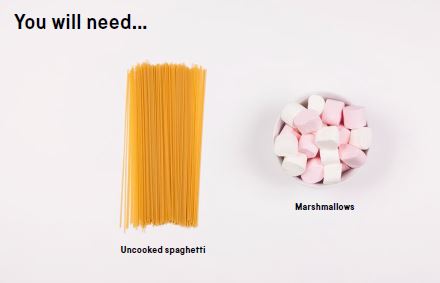
This week, we are using spaghetti and marshmallows to create a super strong design.
Step 1:
Your bridge must span a gap of 30 cm
Think about the structure you want to make. Sketch it out in your book first, remembering the types of structures which add strength (e.g. triangles).
Here's a fantastic video about making gumdrop and toothpick truss bridges, but the principle is exactly the same for your spaghetti bridge. .I have also included the helpful films from last week below if you need to watch again, right at the end of today's web post).
Click here for great truss bridge video
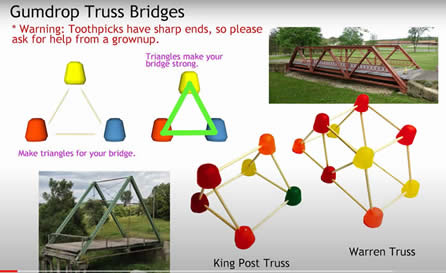
Types of Truss Bridges You Could Make:
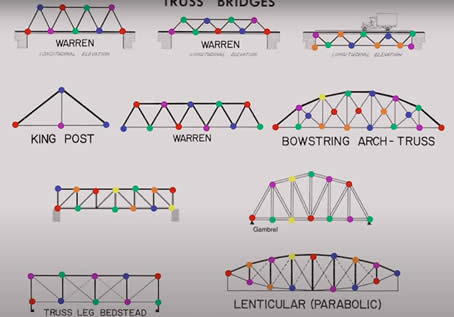
Click here if you want a pdf copy of the above 2 sheets
Step 2:
WASH YOUR HANDS: there's nothing worse than dirty, sweaty hands trying to handle marshmallows carefully.
BIG TIP: Keep your hands cool, and only use your finger tips - marshmallows get very stick and messy if you transfer heat into them.
Step 3:
Work outside if you can...
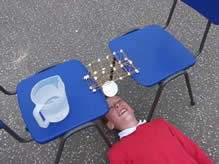
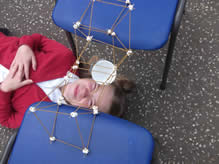
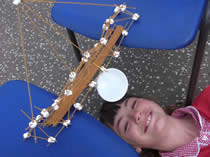
Place two piles of books or pieces of wood (or anything solid you can find) 30 cm apart. Yes! we are going to span a gap of a whopping 30 cm for this challenge, not the half a4 sheet we did last week.
If you can, make the books/blocks high enough so you can hang a paper/plastic cup under the bridge later , to test the weight it can hold. You could use bricks if outide, or two chairs or stools.
Step 4:
Step 5:
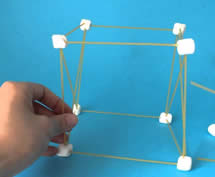
Piece your structures together to make your bridge.
Step 6:
Take a photo of your bridge NOW - before any possible disaster may occur...
Step 7:
If you can, test your bridge outside if you are using water to test it.
Find out how much a quarter, half, three quarters and full plastic/paper cup of water weighs first,
Then, using a paper clip or piece of wire, hang a p[lastic or paper cup under your bridge and fill slowly with water, taking pictures to prove its strength.
(The video above gumdrop truss bridge video shows you how to do this near the end)
If you haven't got plastic cups, you can use coins wrapped up, or small spoons or anything which will increase the weight - you can use the kitchen weighing scales to check the weight first.
If you can't hang anything under your bridge, you could always rest the weight on top , like we did with the paper bridge last week.
Step 8:
Add more cups if you need to - that's if you bridge can take the strain!
Oh No ...Bridge Design Jeopordy This Week:
(Someone could get a little wet !)
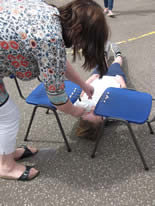
In class we have decided to add an extra challenge this week. We will be setting up our bridges betwen 2 chairs in the playground and the builder will be lying on the ground with their face underneath the bridge.
We are going to fill up plastic cups of water one by one to see who's bridge will hold the most weight... of course when the bridge can't hold any more, the builder may get a little wet ! If you can do the same at home, that would be great (fun?).
Of course, the pictures will be online for you all to enjoy
Some extra bridge strength learning here:
Don't Build Randomly !
Here's some strength videos from last week to remind you of the features which may help your bridge keep it's strength.
Watch these videos to find out some basic methods which I hope to see in your design challenge:
Click here to see what makes bridges strong
Click for a video to see how triangles can help
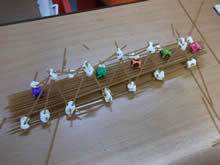
Wednesday 1st July:
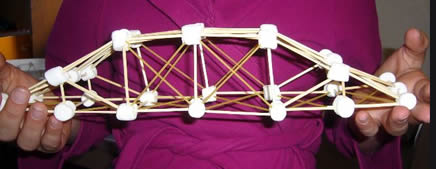
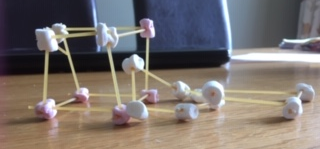
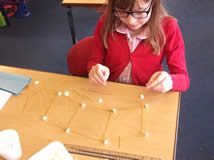
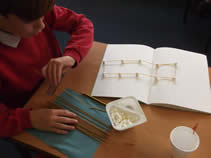
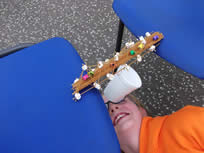
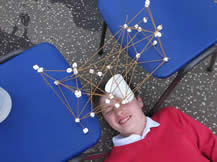
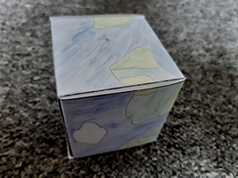
A look at how we did yesterday with our Bridges:
First things first, lets have a look at the brilliant bridge designs you all came up with yesterday.
MH's bridge RD's bridge vrs 2

HP's cube bridge (or is it the collapsing cube bridge !!!)

Geography:
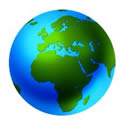
Mapping the Earth's Surface
Today, we are going to investigate how the surface of the earth is mapped. What you may not realise, is that because the earth is a sphere, and the continents are on a curved surface, it is very difficult to get an accurate
picture of what they really look like.
What's the problem?
The problem is that you can't flatten out a curved surface perfectly - which means copying the shape and size of the countries of the world, so they look on paper how they really look on the globe, is impossible.
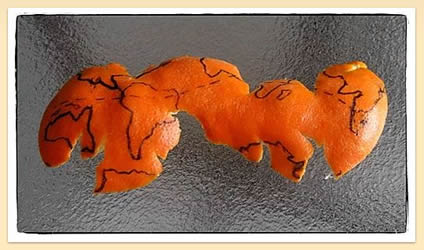
Don't believe me? Then, have a go at this:
Use a felt tip pen to copy the world map onto an orange/tangerine/satsuma.

Next, carefully peel the orange, and you can even cut the peel into sections ready to piece back together. You'll soon see it's impossible to make is perfectly flat.
But, you can see how the world map we see in books is created.
So How Can We Map the Earth onto a Page?
Lots of clever cartographers (map makers) came up with ways of doing this, and the most famous one was called Geradus Mercatore, who invented his world map method in 1569 - called the Mercator Projection.
This is the world map many of us are used to seeing in books (although there are some other projerctions now used as well)

You probably recognise this version of the map of the world and think it is a true picture of our planet.
BUT YOU ARE WRONG - IT IS TELLING LOTS of LIES.
Task:
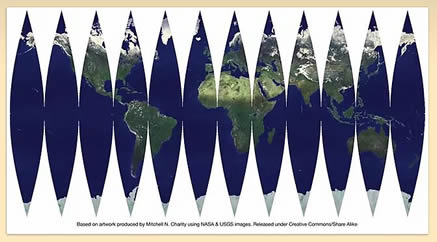
Mercator creates his map by cutting the globe into curved sections which go narrow at the top and bottom - called gores. Here's an example of what a sphere cut into gores looks like (you can download it and make a sphere if you have lots of patience by clicking here)
This is what it looks like with a satellite image from NASA of the earth added (you can download this to print and make if you want, but you'll have to add some tabs to stick the slices together - only do this if you have the time and patience - our real task is below)
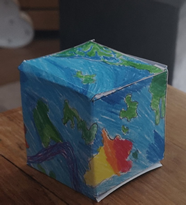
Our Main Task Today: If the Earth Were a Cube
Here's a fun activity to see how our earth would look if it weren't spherical - if it were a perfect cube.
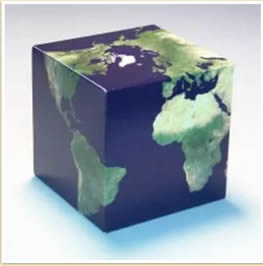
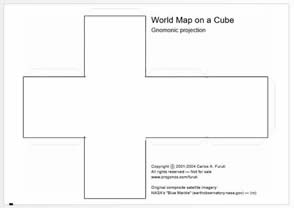
Click here to get a copy of our earth in 'net' form. If you can print it out, cut carefully, including the tabs, and stick it together. Pay great attention to the edges of the countries in the unfolded shape to see how they only match the other section of the corresponding coastlines when they are folded up into a cube.
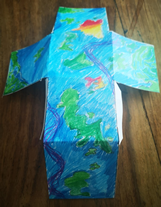
Task: Create Your Cube World:
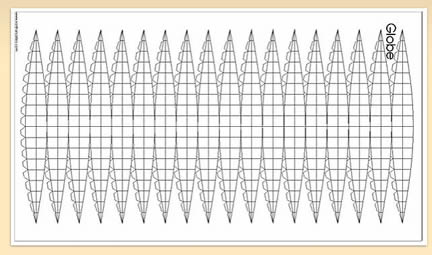
Now it's your turn to design a planet - it could be your cube version of Pandora. Use the blank template below to print out (or if you haven't got a printer, just draw it out with a ruler on a piece of paper, making sure each square is the same size (and you add tabs for sticking together).
Draw and colour your planet continents and seas - think about the vivid colours seen from space of vegetation, deserts, mountains, plains, including colder zones at opposite ends of your planet.
You will need to do this very carefully - don't rush. Create detailed costlines and islands and interesting continent shapes. A sharp pencil or black fine-liner may work well.
Additional Option:
Why not label your newly created countries with neat ,careful lettering, just like a real globe. You'll have to come up with some brand new country names for your own unique planet.
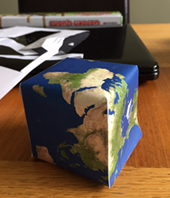
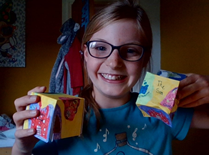
Here's Two Fanatastic Home-School Globes from Today Already?
HP's beautifully constructed cube A brand new world from CD
Some vividly coloured new worlds from you-know-who
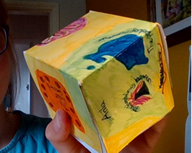
Here's MH's cube planet.
OR's fornight cube
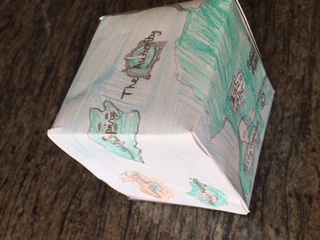
Be careful not to just draw islands in each square - think about how the edges of your countires will only match up when you fold it up as a cube.(Look at the earth one to see how this works).
When you've drawn it and coloured it beautifully, folded and stick it together, take a photo and send it into me so we can all see it.
Sports Day:
If you haven't completed all your events for Sports Day 2020, now's a good chance to add some more points for your house.
Remember to keep filing you form in (it's in word format so you can type your results into it; or print it, write on it and take a photo to send to Mrs Furness)
Your completed results form must be in on Friday or before if complete.
Click on the poster to visit the Sports Day 2020 page
Thursday 2nd July:
Science / Geography:
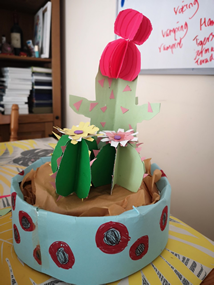
Here's a fantastic origami cactus made by by MH from last week's lesson
Task 1: Growing Seeds Weekly Update
After week 1:
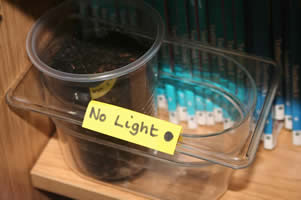
After week 3: Definitiely not green, and growing a little crazily, desperate to find some light.
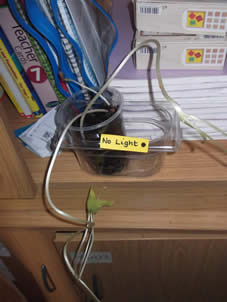
There seems to be a small amount of chlorophyil in the tiny leaves. We think that he plant is grabbing and using the small anount of light from when we open the cupboard to water and check the plant.
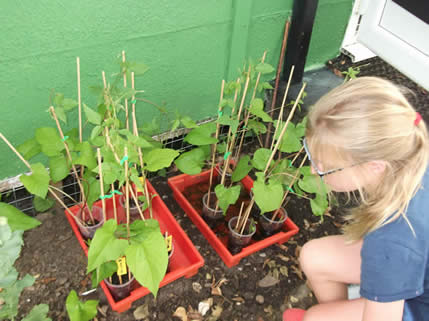
We have transferred our beans outside and they are really growing tall now.
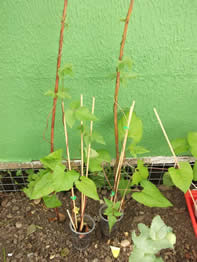
Harrison's plant is currently sneaking into the lead over Dylan's.
Time to see how our seeds have done after week 3 since we planted them. Use your recording sheet, or table you have drawn in your book from last week, to record your observations.
1. Measure any stem growth.(the roots may be difficult to measure now - and in school, we have transferred our plants into the soil outside)
2. Make a careful, 'coloured-in' drawing of how the seed looks now (choose the seed which seems to have grown most, and stick with this one each week until the end of term).
Click here to view the recording sheet from week 1
3D Mapping the Earth's Surface:
Contours and Elevation
Task 2:
Today, we are going to continue with some geographical mapping studies from yesterday. When we looked at how the earth was mapped onto a flat page, we created a 2 dimensional , flat image. But as we all know, the earth is full of 3 dimensional objects: mountains and valleys, cliffs and slopes, hills and canyons etc.
But how do we know by looking at a flat map, how high the different areas of the ground actually are.
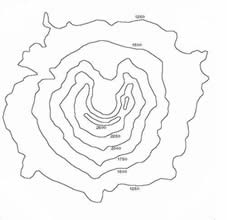
The answer is... we use contour lines: lines draw around the map which tell us the height of the ground above sea level.
If the lines are close together, the ground is sloping steeply. If the lines are further apart, the ground is sloping more gently.
What we are going to do, to show contour lines clearly:
You are going to investigate what these lines would look like if you could magically create a 3d map from contour lines in your atlas.
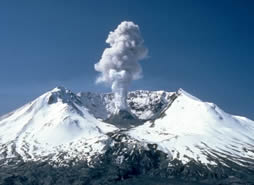
We are going to create a 3d contour map of
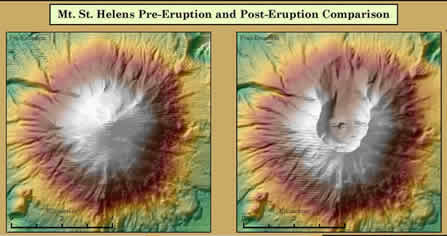
Mount St. Helens, a volcano in the U.S.A., which exploded sideways (yes, sideways) in 1980. The eruption of the volcano blew the whole side of the mountain away, destroying the landscape beyond.
Here is a digital aerial view image of the volcano before and after the eruption: you can see half the mountainside blown away.
 .
.
We are going to make a 3d contour map, or 'evelvation map' of the volcano after the eruption. Here's how:
You'll need:
scissors (be careful)
3 pieces of card or paper to make to big version
1 piece of card or paper to make the small version
Some cardboard
Pritt Stick or other glue - or sellatape
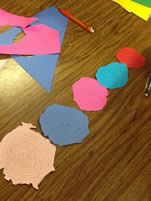
Step 1:
Here to see the templates you need:
1. Coloured template for small model if you are printing in colour. (quite fiddly to cut)
2. Blank template for small model fro printing or copying (quite fiddly to cut out)
3. Coloured template fo larger model if you are printing in colour. (3 a4 sheets)
4. Blank template for larger model fro printing or copying
You don't need a printer, you can copy it onto paper yourself (it doesn't have to be perfectly accurate to get the idea)
This is the master template from which I made the simpler ones for you to use. Click on it if you want this one to try out your own ideas.
You'll need to cut out a full flat piece of each level of the volcano.
Step 2:
If you are using the white templates from a printer, or you are drawing your own, colour each level a different colour - or shades of the same colour for a great effect. For extra detail, write the number of metres each layer represents, on the edge of each layer in clear black pen if you can.
Step 4:
Carefully cut out each coloured layer - each one represnts a different height of the volcano.
Note: the final level consists of two small pieces of land - you cpould make them slightly bigger if it will help you cut them out.
Step 5:
You should now have 6 coloured contours levels (7 pieces as there are two bits to the top layer).
In order to make then rise up, you need to stick some tabs of cardboard under each one.
Tip: f you haven't got glue, roll up pieces of sellatape to make a double-sided tape.

Step 5:
If you have a piece of card (black looks best), stick your final model on the base card and create a title label to stick on, to describe what your model represents:
'This is an elevation model using elevation data of Mount St Helens following the Eruption of 1980.'
: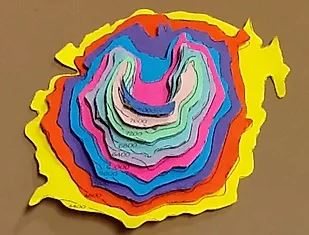
Our model will have less layers than this one as we have used a simpler elevation map to create it.
You should see the 'scoop' in the side of your model, where the volcano material blew away the rock.
Extra Ideas if You Are Inspired:
If you inspired to use this idea to create 3d maps, why not use your imagaination like yeaterday and design your own elevated island - it could be very unusual.
Have a look at this 'Dolphin Island' idea.
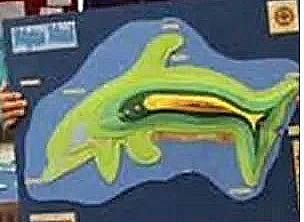
Don't forget to send your photos in to share !
Friday 3rd July:
. 1. Signing::
We've got our final ever lesson from Tyrese this week: it's all about his favourite fun signs. How much signing have you remembered from our previous weeks?
Click on the signing wall below for this afternoon's lesson.
2. Sports Day 2020:
It's the final chance to complete your Sports Day 2020 recording sheet before sending it in to Mrs Furness at:
bethany.furness@wreningham.norfolk.sch.uk
Click on the poster to visit the Sports Day 2020 page