This will be our daily curriculum and project page, where you can find things to do other than our literacy and maths .
Remember, you can email me at anytime with any questions about our weekly activities.
REMEMBER, to work from the back of your book unless you are instructed not to below (our project work will work from the front without other work inbetween).
This Term's Theme is;


This Weeks Activities:
Instructions are in RED
Last Week's Top 5 Kahooters:
(Remember, if you don't sign in Kahoot with your initials, you won't be counted on the leader board - no nicknames)
Well done to MPH, the 'Peppa Pig'
Kahoot Champion
with Tia and Hp second and third!
Activities for Week Beginning 6th July
Click here to go straight to the relevant day's activities:
Monday 6th July:
Task 1: A Random Fun Kahoot Quiz:
Lets do a quiz about 'spaghetti' of course - it's important we keep up our knowledge of pasta.
Follow the simple instructions below to take part - have a go, have a guess, see if you can finish in the top 5 !
1. All you need to do is go to 'kahoot.it', or click on the
banner below..
2. Type in the code of the quiz I have provided below.
3. Type in your initials so I will know its you.
3. Choose A, B, C or D in the time allowed.
4. The Quiz quizes finishes at 3:00pm on Friday - I'll post the results
up next week.
Game PIN: 01886726
Monday 6th July:
Task 2:
Geography Mini-Project:
Last week, we investigated how to create an elevation map, using Mount St, Helens as our model. Mount St. Helens is a much studied volcano, due to it’s incredible eruption in 1980.
Volcanoes like Mount St. Helens get their source of molten rock through faults in the rocks beneath the earth. from below the earth (called magma), and when it reaches the surface, it’s name changes to lava(above ground) .
This week you are going to create a mini project about the Mount St. Helens volcano and eruption, and volcanoes in general. This task will cover Monday, Wednesday, Thursday and Friday curriculum time.
Task:
I would like you to do some individual research about the volcano eruption at Mount St. Helens, in the USA in 1980. I am not going to provide everything for you to copy this week as I want you to do some individual research and make some decisions as to what to include in your project - but I will help you out with some good links and information I have researched for you..
Make Your Own Project Book
You could creater mini-project inside an actual mini-booklet instead of in your writing book.
I've attached the Johnson paper booklet making instructions here, so give this a click.
I suggest the 'book with 8 pages' or even better,'the book with detached cover. If you use a different colour piece of paper or card for the cover it will look great.
Note : these A4 books will be quite small so you will need to write small and delicately.
If you use A3 paper , you'll get a much larger booklet.
You can choose what to include in your mini-project over this week, but I have provided some examples below. Choose 2 or three activities to create your project::
1. A timeline of events leading to the eruption.
2. A FULLY labelled diagram of the sequence
of the eruption of Mount St. Helens volcano,
showing how the eruptiion happened.
3. A FULLY labelled diagram of how the inside of a volcano like Mount St. Helens operates. (it is a composite or 'stratovolcano' which produces dactite lava)
4. A newspaper report of the event.
5. Make a geographical teaching model of a volcano, which tells you waht's going on inside:
I've found three foldable ones here if you have a printer, but you could make whatever kind of model you like (a labelled lego version would look amazing)
a. The icelandic volcanno, 'Eyjafjallajokull' - yes, that's it's real name.
Click here for the model template.
b. The extinct volcano at Arthur's Seat in Scotland. Click here for the model template.
a. Mount Fuji in Japan.
Click here for the model template.
5. An explanation text of the event.
6. A fact-file of details about Mount St. Helens.
7. A piece of quality poetry, describing the terrible event; watching the link I will provide below, will give you lots of inspriation and ideas for this.
8. A imaginary diary of someone who experienced the eruption and saw the events unfold. There are lots of eye-witness accounts on the web, but here is a good one (click here)
Click here for this task list on pdf
Here's Some Help to get You Started:
To help you, I have found three great videos explaining the events below:
Video 1: Click to Visit the Smithsonian St. Helens Video
Video 2: Click here to visit a fantastic short film showing
ONLY images that existt showing the actual explosion fully.
Video 3: Click here to visit a fantastic short film showing the actual eruption from National Geographic
Here's 30 cool facts about Mount St. Helens
Here's a link to a good site to give you lots of information about Mount St. Helen's, along with a quiz to test yourself on your St. Helens knowledge.
Some Diagrams You May Want to Use:
1. Here's a pdf containing 3 diagrams which may be useful foe your project booklet: (click)
2. Here's an additional diagram link of the sequence of how the mountain collapsed
You might find some much better diagrams for your project during your own reaearch qbout volcanoes and Mount St Helens.
Tuesday 7th July:
Design Technology:
Towers of Terror
This week we are going to continue to use design skills to solve a tower problem.
The Design Task:
This week, we are using paper again - but the task maybe a little tougher.
Use your knowledge gained from our bridge constructions to make the tallest tower you possibly can with 6 (yes... only 6) pieces of A4 paper (not card - that's cheating).
Useful Structures:
Think about the structures (like triangles) which were most useful in creating strength last week. You can look in the curriculum archive to watch last week's useful videos to help if you like.
Click here for some help with how to make a strong tower structure with paper and tape.
The Rules:
1. You may only use 6 pieces of A4 photocopier thickness paper.
2. You may cut, fold or bend the paper however you wish.
3. You may use tape to fasten the paper together, but you are not allowed the wrap the tap continually around bits of paper - if you do this, you are effectively creating pieces of plastic!
4. When you measure your tower, it must be free standing, without anyone, or anything holding it up. You are not allowed to tape it to the desk or floor either !
Measure your tower from the ground to the top most tip and send a photo and the measurement in... this is going to be very competitive.
Good luck tower builders.
Wednesday 8th July:
A look at how we did yesterday with our towers:
First things first, lets have a look at the brilliant tower you all came up with yesterday.
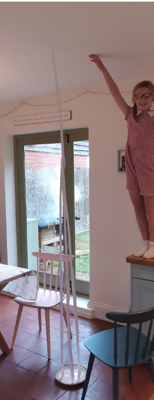
Wow .. her tower hits the ceiling... But news has come to light that
using strong triangular prisms . . this one from RD may be a fraud
A huge 2.5 metres !
! 
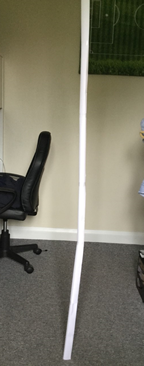
Some good design here for the base... but this IS cheating!
The Leaning Tower of Class 4... Very sensible design.
Some cheating going on here as well... But this one is a design masterpiece...
Both over a metre high here... well done.
Just about standing... I hope uo're not holding that ...
My goodness... it's actually standing...
A huge 1.53 m from home... impressive But can paper hold me up?
Spread out the weight... and.... incredible paper strength - great engineeering
Geography Mini-Project:
Continue with your mini-project. See Monday's task to see what options you have.
Thursday 9th July:
Science / Geography:
Task 1: Growing Seeds Weekly Update - WEEK 4
After week 1:
After week 3: Definitiely not green, and growing a little crazily, desperate to find some light.
There seems to be a small amount of chlorophyil in the tiny leaves. We think that he plant is grabbing and using the small anount of light from when we open the cupboard to water and check the plant.
We have transferred our beans outside and they are really growing tall noww. BUT, it seems some creature is now set on eatong our beans overnight More updtaes on Thursday !.
Harrison's plant is currently sneaking into the lead over Dylan's.
Time to see how our seeds have done after week 4 since we planted them. Use your recording sheet, or table you have drawn in your book from last week, to record your observations.
1. Measure any stem growth.(the roots may be difficult to measure now - and in school, we have transferred our plants into the soil outside)
2. Make a careful, 'coloured-in' drawing of how the seed looks now (choose the seed which seems to have grown most, and stick with this one each week until the end of term).
Click here to view the recording sheet from week 1
Task 2:
Geography Mini-Project:
Continue with your mini-project. See Monday's task to see what options you have.
Friday 10th July:
Geography Mini-Project:
Continue with your mini-project. See Monday's task to see what options you have.

